Have you ever dreamed of making your own cheese at home? Sink your spoon into it, stick it in your mouth and enjoy it while mouthing “how good! And I did… Just me, with my own hands!” Cheese is one of the foods we grew up with. We have been finding it on the table since we were little, and we love it as much as we ignore what it takes to get it. It is often so with the things we are accustomed to: we ask few questions about their roots while we enjoy their fruits. And if we were to ask ourselves-where should we start?
Well, I have great news! In this article we will take a journey to understand how milk curdles and becomes cheese! What’s next? Then we will figure out step by step how to make cheese directly in our kitchens! It will be fun and rewarding, an activity to do with friends or family but also on our own to enjoy a moment with ourselves. A way to go back to the basics and experience firsthand how the things we eat every day are made. All clear? Then let’s get going!
The role of rennet in cheese production
Rennet and milk caseins
Let’s start with the big secret behind this fascinating process: rennet. Don’t worry if you don’t know what it is, I’ll explain it right away. Imagine rennet as a real wizard: once combined with milk, it has the ability to transform it from a fresh, nutritious beverage to a delicious cheese. Yes, one mysterious ingredient makes such a big difference. But how does the curd perform this magic?
It all starts with caseins, which make up 80 percent of all proteins in milk. Caseins are like cheese superstars and have different personalities. There are alpha-caseins, beta-caseins and k-caseins, each with its own special characteristics. The first two are somewhat shy and prefer to stay away from water, while the k caseins are adventurers who like to dive into the water to protect their shy friends.
In tecnichese, alpha and beta caseins are said to be hydrophobic, while k caseins have hydrophilic tails that wrap around the other two to shield them from water and protect them. These complexes are therefore found dissolved in milk and there are many of them.
In the image above, you can see the tails of the k caseins throughout the outer layer of this “bubble” full of alpha and beta caseins hiding inside. This complex is called micella.
The presence of k caseins is essential to kick off the cheese-making process. Now we will see how.
How does rennet come into the picture? And what does it consist of?
Rennet is a complex, grouping of special proteins called enzymes. By their nature, enzymes react with and modify certain molecules. In our case, the enzymes contained in the rennet go to cut the caseins contained in the milk, breaking them up. This action is called proteolysis.
We are interested in two of these rennet enzymes in particular:
- Chymosins are the surgeons of targeted proteolysis: they cut a particular spot in the target casein
- pepsins, on the other hand, like to do generic proteolysis, shredding here and there. More butchers, let’s say.
Together, these enzymes make magic. Don’t worry if it sounds a bit complicated, read on and I will explain how rennet turns milk into curds, step by step. Eventually, with a clear understanding of the process, it will be time for the recipe for making cheese at home. Let us now look at the different steps that lead to turning milk into cheese.
Step 1 of cheese production: the curd
When we add rennet to milk, as mentioned just now, some really interesting transformations take place! Imagine this magical reaction that turns milk into delicious cheese. Here is what happens step by step:
PHASE 1
Chymosin, one of the enzymes contained in rennet, goes into action. It cuts a particular bond in k casein, one of the milk proteins. This cutting causes part of the k casein, that water-loving tail, to separate from the rest of the protein. Coming apart, the micelle no longer knows how to remain firm in its structure: a kind of collapse of the structure that protected the alpha and beta caseins takes place.
PHASE 2
Caseins, when exposed to the aqueous environment of milk, are insoluble and precipitate. These proteins react by aggregating with each other to cover each other’s backs: in doing so they take the form of a kind of gel that gives rise to curd. It is as if small bricks are created in the milk that come together through special bonds: calcium bridges. These calcium bridges occupy the space vacated by the hydrophilic part of k casein. Thus, little by little, the curd takes shape.
STEP 3
The enzymes that unravel caseins continue to act, and they are broken down into smaller and smaller molecules. This step is called hydrolysis in tecnichese. In parallel, the whey, the liquid and watery containing part, is separated from the curd. Basically, the cheese contracts and concentrates valuable substances in the curd. In fact, three-dimensional lattices are formed during these stages, collecting not only the precipitation of caseins, but also sugars, fats and protein residues that were in the milk.
This is how, thanks to the action of rennet, milk is transformed into delicious curds that will then be the basis for cheese production. There are several factors that help determine the kind of cheese we will get. For example, there are different types of rennet: depending on the different percentages of pepsin-the butcher-and chymosin-from surgical precision, we will get a different cheese. Let’s look at them briefly.
The choice of rennet
Choosing the right rennet plays a key role in determining the texture and characteristics of the cheese we intend to produce.
If we wish to obtain a softer cheese or cheeses with a long aging period, it is advisable to use a rennet that contains a higher amount of pepsin. The use of a higher concentration of this enzyme ensures prolonged action over time. In general, increased pepsin concentration corresponds to increased speed and a clot with a more pronounced consistency. Based on the characteristics we want to achieve, we must make a judicious choice in the selection of rennet.
Other influencing factors
- Temperature: regulates the speed of the cutting action of enzymes
- pH: regulates the balances of salts within the casein complex, and consequently their stability
- composition of milk: proteins, salts–for example, calcium is very important for coagulation, being responsible for the bonds between caseins after contact with rennet
- Bacterial flora: bacteria-intentionally included-influence texture and consistency of the finished product
- timing and mode of cutting are important in defining how much water will remain in the product
Step 2 of cheese production: cutting
After placing the rennet in the milk, as we have seen, the proteins will precipitate and we will have a gel phase, with floccule formation. The time it takes depends on the many factors just seen, and so it is crucial to pay attention to what is happening. We have to be present and understand it ourselves.
How? Inserting the hand into the milk and lifting it up. If coagulation is already taking place, we will notice how flocculi will remain on the palm of the hand! From the moment we perceive the first flocculi, a moment referred to as setting time in technical jargon, how long we have to wait is variable. There is no single perfect firming time, and in Italy, the experience of the cheesemaker takes the lead. I mean, we will have to figure it out by trying 😉
Cutting is a crucial moment. Depending on when we do this will determine the fate of our cheese: will we have the right amount of sugar, protein, and fat in the lattice?
If we cut too early we would risk having a nutrient-poor cheese with a brittle structure, because it will not have had the right amount of time to form sufficient calcium bonds and trap nutrients. If we cut too late then on the contrary we will have too hard a lattice, which will fail to purge the whey properly.
We just have to try, we have to feel it. But don’t worry, you’ll get all my advice later. This will not guarantee you will avoid all mistakes, but that is normal: we need to gain experience, and to gain experience, mistakes are part of the process. They will help us better understand what we do, and how the outcome changes depending on the choices we make. Only then will we get to the point of deciding based on the outcome we like best!
Here it is finally time to experiment.
Homemade cheese recipe
Ingredients and tools
- 2 liters of fresh milk
- ½ teaspoon liquid rennet
- Pot
- Kitchen thermometer
- Knife and whisk (for cutting and obtaining flocculi)
- strainer/blanket with cloth (for purging)
Proceedings
- Pour the milk into the pot and bring it to 40°C (104°F).
- Turn off the heat and put ½ teaspoon of liquid rennet into the milk
- Mix well and then let stand without stirring, allow at least ten minutes to pass before checking whether coagulation has occurred
- Insert your hand to check for flocculation. Depending on the rennet used, times change so it is always best to check frequently the first time, just touch the surface with a finger. Mine after ten minutes had already curdled. When there is flocculation, cut the surface into the shape of a mesh, then turn with the kitchen whisk to break up the mesh
- Pour the curdled milk into a pan to which we will have adhered a cotton or linen cloth, and underneath put a pot to collect the whey. Pour in the curd a little at a time and allow it to purge some whey before pouring in more, we will facilitate the process.
- Press with fingers to help and wait ten minutes. Turn the form upside down, press it well, and let it rest another ten minutes. When it reaches the right texture, it will be ready.
- Finally, cover with foil, refrigerate and wait a few hours before consuming your primosale!
It will keep about 3-4 days in the refrigerator.
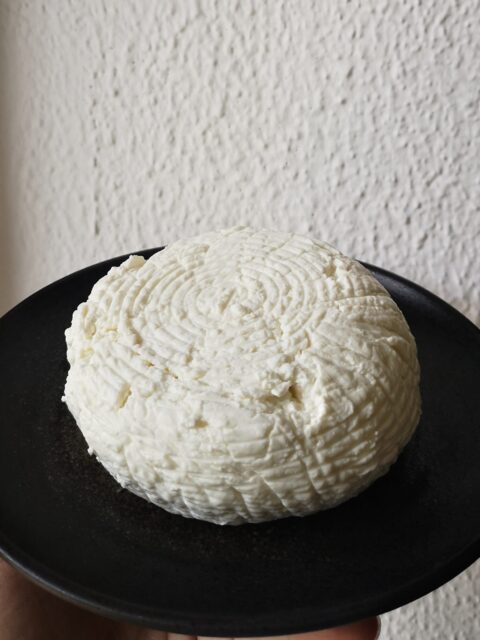
Here is my first primosale, I can’t tell you the pride as a new cheese mom:
Hold on, what about the serum?
How to make cottage cheese from whey
From the whey we will keep aside, cottage cheese can be made. Here’s how.
Ingredients
- Leftover whey from 2 liters of milk
- 250 ml fresh whole milk
- 3 tablespoons of lemon juice
- 3 grams of salt
- Pot
- Kitchen thermometer
- spoon
- strainer/blanket with cloth (for purging)
Proceedings
- Heat whey, whole milk and salt in a pot. Reach a temperature of 88-90°C by checking with a kitchen thermometer
- Once the temperature is reached, turn off the heat and acidify by adding lemon juice to help coagulate the small flakes
- Stir and cover with lid, wait 15 minutes
- Using a spoon or a skimmer, scoop out the ricotta flakes on the surface and gently transfer them to a pan or strainer, on which we will have adhered a cotton or linen cloth
- After the whey is drained, store the ricotta in the refrigerator and consume it within 3 to 4 days.
For me it was a wonderful “first time,” which I found exciting and fun. The result left me very satisfied: the cheese I got was good, with a fresh taste. Simple and pleasant.
Making cheese at home: buying tips
I’ll leave you with some suggestions for purchases that would have come in very handy for me when I decided to try my hand at this venture:
The linen/cotton cloth, which goes by the name of muslin , can be found in haberdashers or online by doing a quick search. Even the fuscelle , the perforated plastic molds used to shape the cheese while it drains the whey, are easily found online. However, I opted for a very similarly shaped metal skimmer that I found in a kitchen tool store, thinking that this way I can reuse it in a variety of ways.
Liquid rennet can be found online or in pharmacies, ask the attendant!
Now all you have to do is try! The process is really simple, the result surprising and fun. And be sure to write to tell us how it went!


